Homemade Surprise Chocolate Eggs
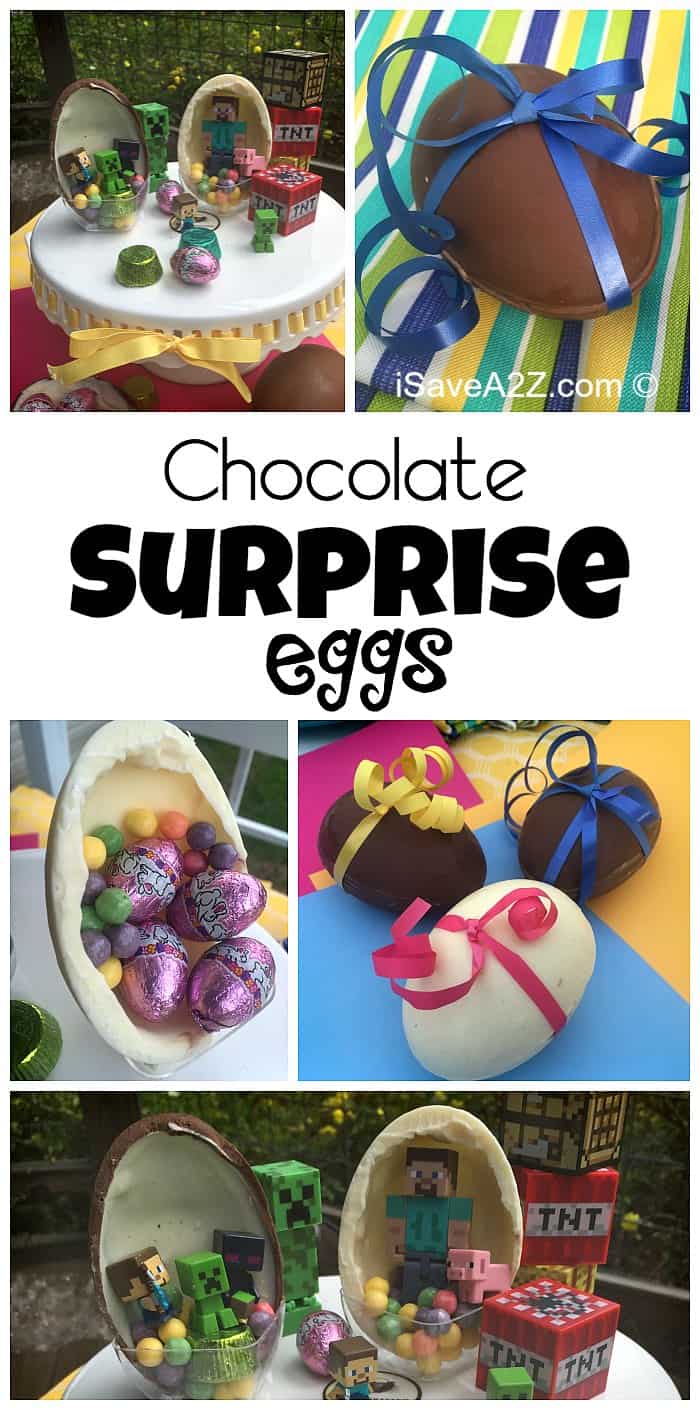
Homemade Surprise Chocolate Eggs
How about a perfect idea for Easter with our homemade surprise chocolate eggs?! Anyone remember Kinder Surprise eggs? They are a small chocolate egg with a surprise in the middle. The outside of the shell is a milk chocolate and the inside of the shell is a white chocolate. I used to live in Germany and those are highly popular overseas. Or at least they were when I was a kid.
I vividly remember the Kinder Surprise eggs as though it was just yesterday. It wasn’t really the chocolate that I remember but rather the surprise in the middle. Kinder is a german word that means children. They have since been banned because of the very small plastic egg that held the inside toy was a choking hazard for small children.
I wanted to make a version of my favorite childhood Easter candy but without the choking hazards involved. Here’s the fun part, you can fill the chocolate with age appropriate toys or candy as you see fit for your own child. My child, who is 10, is really into Minecraft right now and they make some very small Minecraft mini toys that will fit perfectly into our eggs. Oh she’s gonna LOVE it!
There are a few techniques you need to know to make this project super easy. You can have multiple eggs done in under 30 minutes. It’s totally worth the time!
Ingredients list for our Homemade Surprise Chocolate Eggs:
- Melting Chocolate (see below for my recommendations)
- Egg mold
- Spatula
- Microwave safe bowl/dish
- Hot plate or griddle
- Optional: Candy or toys for the inside of your egg
Directions to make our Homemade Surprise Chocolate Eggs:
Start by laying out all your ingredients before you start. I specifically wanted to make milk chocolate and white chocolate eggs. I also wanted to make some eggs with a milk chocolate outside with a white chocolate inside.
I ended up using a medium sized egg mold for chocolate like this one found on Amazon. It fits a huge handfull of candy and some decent size toys too. You can get a larger chocolate mold or even small chocolate molds depending on what you want. I wouldn’t suggest going to small because you won’t fit much inside of the chocolate egg. I would use the smaller ones if you want to make a solid egg. Click this link to see all the different Chocolate Mold trays Amazon has to offer. There are even some with designs on the outside too.
Important Tip: You want to use a mold that is designed for chocolate. Your chocolate will release from the mold with a light tap without any damage. You won’t even need to use a spray because the chocolate won’t stick to it.
Next we need to heat the chocolate. I used a milk chocolate almond bark and a white chocolate almond bark. They come in cubes and they taste amazing. You can basically use any type of melting chocolate. These chocolates can be found at your local grocery store in the baking isle.
To heat the chocolate, I place about 4 to 6 cubes in a microwave safe dish and heat them for 30 seconds at a time. Be careful, it’s real easy to burn chocolate. I only had to heat mine twice for it to be fully melted. The chocolate will also hold it’s shape until you touch it with a spoon too. So don’t just look at the chocolate between heating cycles. You want to actually try and stir it to see how much more time is needed before it’s fully melted. I heat the milk chocolate and the white chocolate one right after the other.
Note: 4 to 6 cubes of chocolate will make about 3 to 4 medium eggs.
Once your chocolate is heating you will need to fill an egg with the milk chocolate first. (I do the milk chocolate first because that’s what I want my outer layer to be. You can only have one layer or you can add another layer if you wish)
Basically in this step you are filling the eggs with chocolate and dumping out the center to create a hollow shell.
Once the chocolate is filled to the top of the half egg on both sides of the tray (as seen in the video), place it in the freezer for a few minutes. Maybe 4 to 5 minutes. This will allow the outside of the shell to start to harden. You don’t want the whole thing to harden because you need it hollowed out in the center for you candy or toys.
Remove the tray from the freezer when you see just a bit of the outside of the shell start to harden. You can tell by moving the tray in a circular motion to see the inside chocolate moving with the outside is hardened.
Now dump the center milk chocolate that is still melted back into the microwave safe bowl leaving only the harden part still in the shell. Once all the melted chocolate is out. Tap the tray to make any chocolate lines disappear. Place it back in the freezer to completely harden the shell that is left.
Now it’s time to add the optional white chocolate inside layer. Skip this step if you only want a milk chocolate egg. The white chocolate should still be melted. You have only had it out about 6 minutes or so. You can always through it back in the microwave to remelt it if you get interrupted during process. We are Moms, we almost always get interrupted. 🙂
Fill the chocolate egg with a second layer of the white chocolate. This time put it in the freezer for only about 3 minutes and dump the remaining white chocolate back in the bowl. Tap it on the counter to smooth it out and place it back in the freezer to harden the whole egg. It only takes about another 3 minutes or so. I purchase three different egg molds to keep this process going. You can use one egg mold but it will take longer.
After the eggs are completely hardened you will need a hot plate to do the next step. By hot plate I mean a griddle or just a plate that has been run over hot water. Basically you will melt the edges of each egg half and stick them together. Be sure to have your candy or toys ready to place in the center before you start this step.
I used a griddle for this part. I heated the griddle to about 250 degrees. I placed each egg half on the hot plate and pressed down for a few seconds until I started to see it melt. This allows the edges to be perfectly even when you go to press both egg sides together. It also reheats the chocolate to create the glue effect you need for them to stick together. This is where the spatula comes in handy. Use the spatula to grab the egg of the griddle and immediately fill it with the candy or toy you want in the center. Grab the other half of the shell and stick them together. I used my fingers to smooth out the chocolate edge to help it stick. Be sure you heat it long enough to create a melted chocolate. If you don’t, it won’t stick. Be sure to hold it together for about a minute to secure the chocolate and give it time to solidify. It doesn’t take long at all.
We decided to make some all white, all milk chocolate and some with the milk chocolate outside and the white chocolate in the inside. They are all delicious.
This is a fun way to make Easter extra special and personalized with your child’s favorite candies or miniature toys. Just make sure they are not a choking hazard and age appropriate if you are making them for others. I always worry about that.
Here’s a quick YouTube Video showing different steps of the process and a few photos of the many eggs we finished.
We hope you enjoy this project as much as we have!