
Shipping Container Carport and Storage Idea
Shipping Container Carport and Storage Idea
I’ve been wanting to write this post for a while now because I’ve already had my shipping container carport and storage up for more than a year. We moved out to the country to a little place with acreage that didn’t have a garage that we were used to. It would be a while before we built our dream home so we needed a quick storage place that didn’t break the bank. We live in Texas so a place to park our vehicle in shade is also pretty important too. We have a teen so we have a total of 3 vehicles, a tractor and a motorcycle. This is where the brainstorming began.
UPDATE: See below at the very bottom of this article for an update we did with concrete and electrical work!
The hubby wanted to just build a garage but we didn’t want to build a garage without our home being built first. Not only would it take a while but we just didn’t have it in the budget just yet to start building. We needed a solution to fit a $4000 budget. There are plenty of kits for carports. Most of them are very cheaply made and would probably be destroyed with the first storm that hits. I can already see many falling apart as I drive down some of the back country roads. I wanted something sturdy.
I tried to convince my husband to look at shipping containers. He looked at me with the crazy look and said “I have never heard of such a thing.” I couldn’t really find a photo on the internet to show him what I was visioning. I knew my idea wasn’t crazy. I also knew he needed a visual. I started searching shipping container homes. It’s amazing what some people have made out of shipping containers. I met a guy that actually welded three shipping containers together to made a full office! I even saw swimming pools made out of shipping containers. We didn’t need anything fancy. We needed storage and shade stat!
I started my research on shipping containers. I read lots of forums and even visited a local shipping container yard to see what I could find.
Here’s a few tips on how to purchase a shipping container:
- Find a local shipping container yard close to you because transporting it to your house could get expensive. A simple google search using the words shipping container, storage container or conex box with your city should do the trick. Here in the Austin Texas area I decided to visit the Falcon Structures yard.
- Choose a size you need. These shipping containers come in 10 feet, 20 feet and 40 feet lengths.
- Inspect the container for damage or welding.
- It will be important for you to walk inside the shipping container to smell what the inside smells like. These shipping containers are spraying with chemicals depending on where they are used and you can smell some pretty nasty containers. In all the research I’ve done the most regretted thing was not smelling the inside of the container. If you start using a container that has a nasty smell, you will get that smell in anything and everything that is stored in the container.
- Shipping containers seem to fluctuate in price. Be sure to shop around a bit and see what they are going for. I ended up purchasing a 20 foot container for about $2900. Taxes and delivery fees are extra.
- You might consider a venting option or a newly painted container depending on what you are using it for.

I took my youngest and headed to the yard to start the inspection process to find the right container for my needs. I knew that I would use it for storage of chicken, goat and dog food. I would also use it to park a motorcycle. I might add some shelving at a later date. I had plans to add carports on each edge of the container so I didn’t opt for anything extra but the container when I purchased it. We ended up added a vent to both ends of the unit along with a solar powered fan unit to keep it cool during the hot summer months. It took a little welding but it was done in just a few hours. The solar fan set up was super simple too! We purchased one that is very similar to the solar powered fan unit on Amazon. We were able to get it for just over $200. This was probably one of the best things we could have done for our shipping container. It’s not terribly hot in the summer months and works like a charm! We were a bit hesitant on added solar because we weren’t sure it would be strong enough to handle the venting of that large 20 foot container but it does! We added a vent on the opposite side of the container so the air flows nicely. Best decision ever.

Now that we purchased our unit we needed to figure out a place on our property for it to sit. I had the measurements so I purchased a few concrete block stepping stones for it to sit on after I leveled the area. I knew I wanted the container to be a little bit higher than the ground because I wanted to build a concrete ramp to drive the motorcycle into it. I also wanted to build a metal carport off the sides and it would be important for the water run off.

The container only took minutes to unload from the truck onto the spot I prepped.


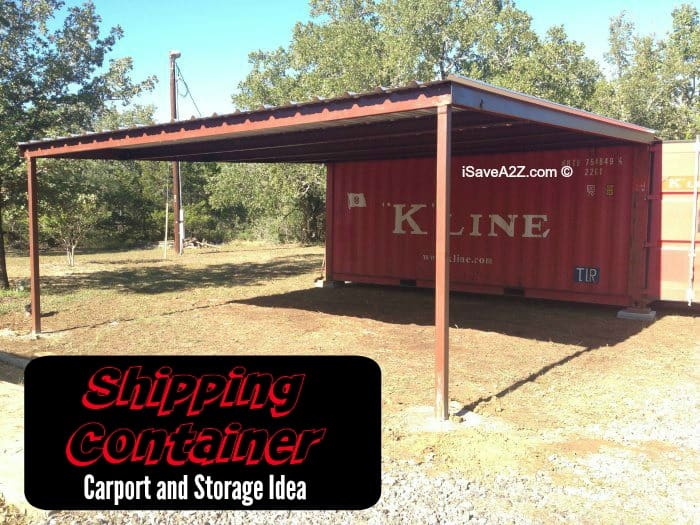
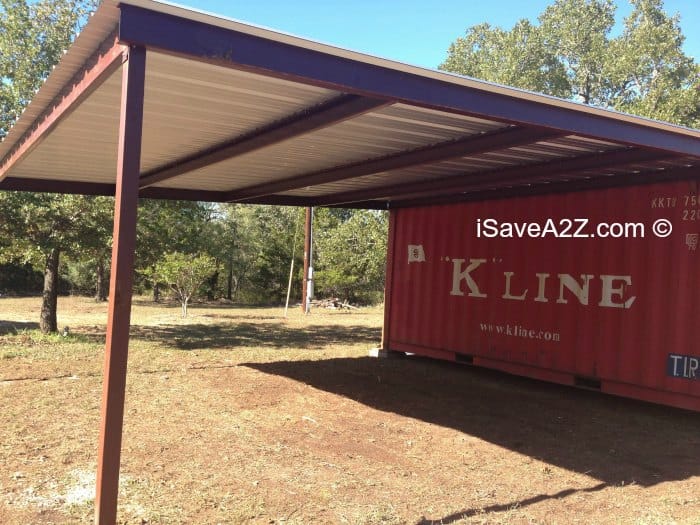
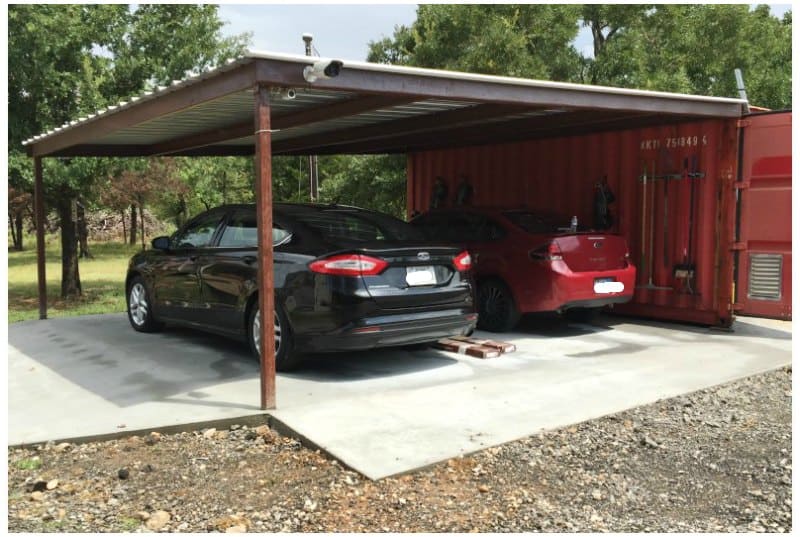
Next plan was to design the carport area. I placed two of my vehicles side by side on one side of the container. I made sure there was enough room to open the doors without banging the other vehicle. I ended up designing a 21 foot by 20 foot carport off the side. I headed to my local metal shop with a design I drew out on a piece of paper. I started with only one side of the container because I wasn’t sure how hard this would be to assembly. I was able to get some metal purlins and some 3 inch metal posts. Luckily the metal shop I used had a small sample model out front so I can see exactly how to construct this thing. Here’s a photo of the small sample at our local metal shop.


My dad, brother and husband are pretty handy but I had to bring the wealth of knowledge they needed to get this thing up without a problem. I was going to construct this carport off the top edge of the shipping container. This saved me from purchasing posts on one side. We ended up using some self tapping screws made for metal that the metal shop recommended. We were able to use all self tapping screws to get this carport up. We did not need to weld any part of it. We also made sure to use concrete to set the posts down 3 feet for added strength. This carport is not moving anywhere! We’ve had many storms (some record breaking weather for our area) and this thing did not move at all. The metal for one side of the carport costs around $500 to construct. Not bad and I was still under budget! In fact, the carport project went so well that we decided very quickly to add another carport on the other side of the shipping container so that all of our vehicles could be covered from the heat.
I do have plans to paint the outside of the shipping container after I build up a bit more of my savings. I’ve already started removing the vinyl lettering on the outside of it by heating it with a heat gun. I’m not sure if I will just paint it one color or add a design on the side of it. A big Texas flag would be awesome don’t ya think?!
We finished our project by building the form and adding concrete for the ramp and calling in a load of crushed asphalt. The project is complete and within our budget. I’m a happy camper! My husband was impressed when we finished. I can’t tell you how many people who visit have asked how they would go about doing this project. It’s definitely the conversation starter the minute someone visits.

I’ve included a bunch of photos of the building process. We have gotten a great deal of use out of our new storage and shade. Even out goats love to hangout under it.
Here’s the finished project with both sides complete:
A photo posted by Jennifer Garza (@isavea2z) on
I have to give a shout out to my family for helping us build this carport. Thank you Ray and Dad!!! The rain held us back a bit but we were able to get this thing up in only a couple of days!
I hope you find this helpful and if you have any questions, please leave a comment below.


Feel free to Pin It on Pinterest using this photo below:

UPDATE!!!!
We just added concrete under each carport area and electric to the unit also! It’s so exciting to see everything come together. Here are a few photos.
This is the form up of the concrete slab foundation:

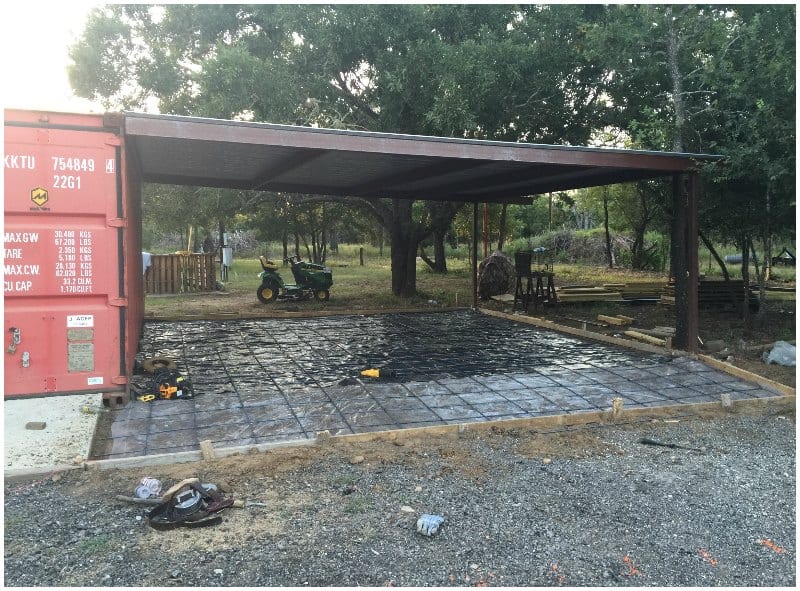
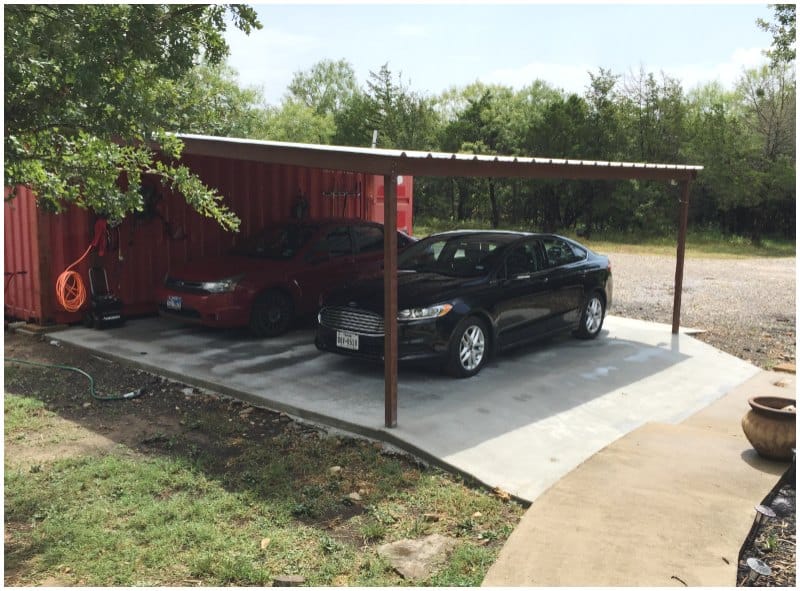
Voila! It’s done!!! This concrete project took only 2 days with about 5 helping hands. The first day was the form up and the second day was the concrete. Estimating the concrete can be done easily online with this handy, dandy concrete calculator. Each side of this carport measures approximately 20 x 21 feet. We also did a huge slap in the backyard at the same time that was 15 x 50 feet and the whole project between them both took 2 1/2 trucks of concrete!
Now to finish the project I plan to paint the shipping container. My creative juices are flowing but it’s way too hot outside in the heat of summer to even think about starting that project. Stay tuned for another update later in the fall.


Great job! Looks fantastic. We have a shipping container that we got this past year without seeing it. Has a bit of musty smell. I would love more info on the venting you did to see if maybe we could do that here in CO.. Appreciate it! Thanks.
Awesome. After seeing your post, I did the same thing in the Hi Desert in CA. Shade is critical out are way. Thanks for posting.
Do you have a parts list for the metal for this carport??
I have the same size container
Thanks
Hi
I live the Austin area.
Have a storage container cabin
It needs a shaded area
What shop did you use to get the metal frame for the car port??
Thanks
R
I used DDM Metal Building Components in Bastrop.
I appreciate your tip about smelling the container. This is something that I never would have considered, but I can see how easily a bad smell could get into all of your stuff. Do you think that going for the venting option that you mentioned would help to avoid this issue? Thank you for such a helpful article and for all of the applicable advice!
I’m sure it would help some but most of the research I have done states that smell is in there even after extreme effort to clean and remove it. I would rather being extremely picky when choosing my container rather than having to deal with smells later.