IKEA Desk Makeover Using Stencils
(This post was sponsored by StencilEase.com but all the love expressed in the article is 100% my own)
IKEA Desk Makeover Using Stencils
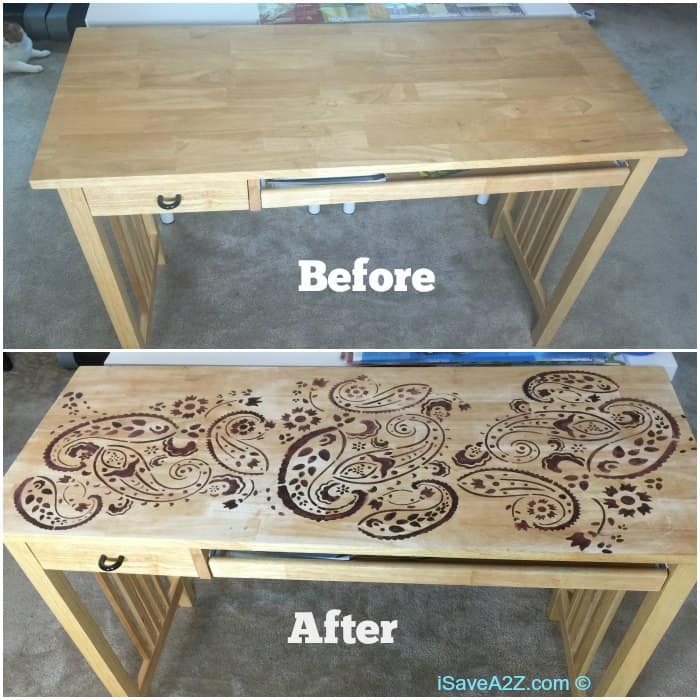
So I bought this desk at a garage sale a while ago. It’s an IKEA desk that has a few minor marks on the top of it. No problem. I’ve got a bit of sandpaper that can take that off in no time.
My problem was trying to decide what to do with this plain, boring desk. I started shopping at StencilEase.com and found some fun designs that gave me tons of inspiration. The hardest part was narrowing down all the stencils I love.
Here’s the before photo of this IKEA Desk:
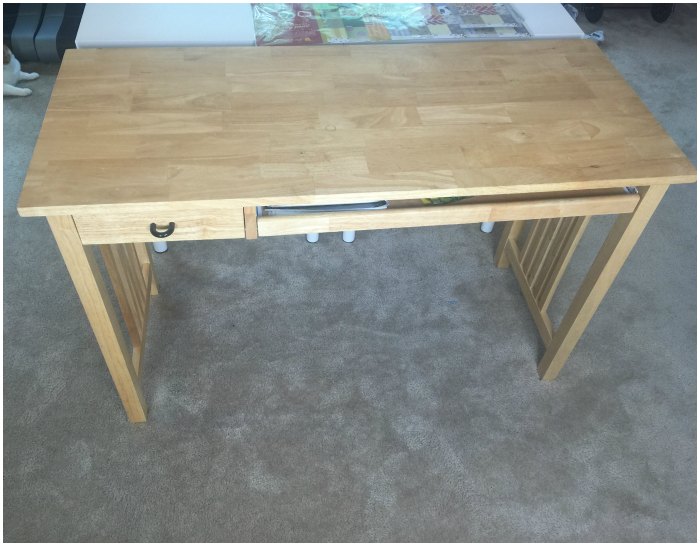
Not bad for $10 right?!
This is a desk my daughter uses to do her homework.
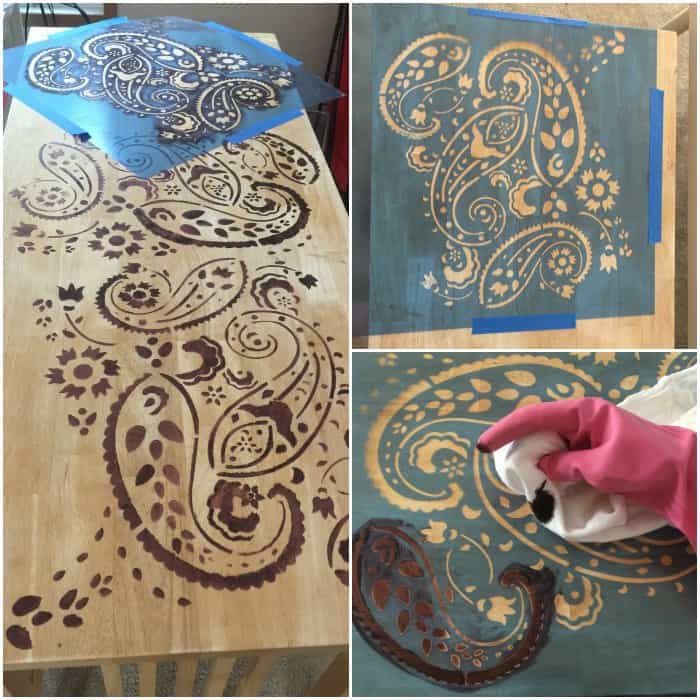
I finally narrowed down my stencil design search to the Avant Garde Paisley for Wall and Floor. I prefer this one because it’s huge and I don’t have to create a random design myself. I decided to go with a dark cherry stain I purchased from my local hardware store to really make the color pop.
Here are the supplies I needed for my IKEA Desk makeover:
- Desk
- Sandpaper
- Rag or stain brush
- Stain
- Stencil of your choice
- Painters tape
- 3M Adhesive Spray
- Gloves
- Polyurethene
- Paint Brush
Here’s how I transformed my IKEA Desk:
First, I sanded all the stains off the top of it using a little palm sander. I started with a rough sandpaper and finished it with a smoother one.
I cleaned the desk after the sanding so it was clear of all dust.
I took my stencil design and laid it out on my project to see how this design would lay out. I didn’t want the whole desk covered but I did want a good portion of it covered. After getting an idea of how you plan to start, next you will spray an adhesive spray on the back of your stencil. I prefer to use the 3M Adhesive spray like this one here on Amazon. You can also purchase this at your local hardware store.
TIP: When you spray the adhesive on the back of the stencil be sure to cover the whole area. Test the stencil on a surface. If there’s too much spray, you can use a piece of cardboard to stick it multiple times so remove some of the excess spray.
Place your stencil in the place you want to start. I used a piece of painters tape to hold it in place just in case the adhesive spray didn’t work but it worked just fine.
Now it’s time to start dabbing little amounts of stain on the wood surface of your desk. When I say a little, I really, really mean a little bit. If you use too much liquid stain it could go outside the stencil and ruin your design. (If this does happen, just sand the area and start over)
There are a few different ways to apply the stain to your project. You can use a little cotton rag and gently wipe a small amount over the area. You want to make sure you are dabbing the area. You can also use a little foam brush like this one. I started using the rag method but quickly switch to using a foam brush. If you use the foam brush (which is my favorite method) be sure to dip the brush in the stain and then press the foam brush on the side of the can to release most of the stain from the brush. This way you won’t be applying too much stain at one time.
Finally, once the stain has dried completely, you can cover the desk with a Polyurethene to protect it. There are different types. You can get the spray can kind or the kind you brush on. I wouldn’t get the spray can for a large project though.
Here’s the final project:
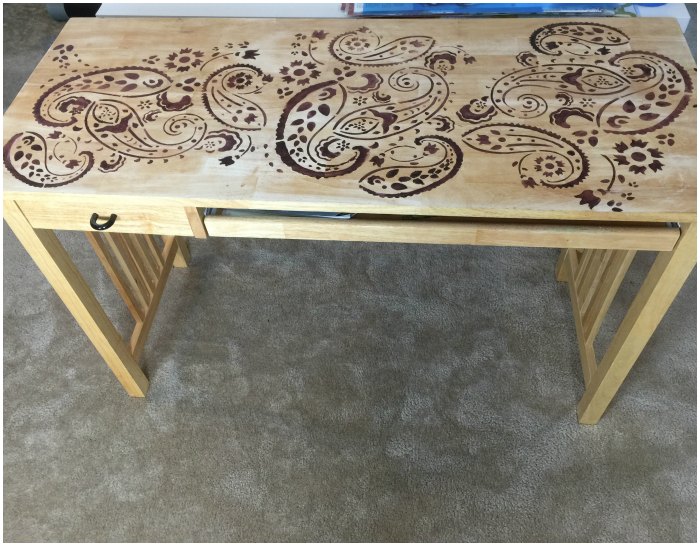
What do you think? I really like how it came out. My daughter loves it!
Be sure to check out StencilEase.com and look at all of their Decorative Stencils here. They have all kinds for all different types of projects. I have a few ideas to create even more projects with stencils so you will have to stay tuned! I already have an idea to make my dining room table a one of a kind with stencils and I have a plan of attack for my patio too! I love the large wall and floor stencils because they make it really easy to do large projects with a continued design.
Enjoy!