Sourdough Bread for Beginners: How to Rehydrate Starter (plus a Basic Sourdough Recipe)
New to sourdough? Learn how to rehydrate a sourdough starter, feed it properly, and make an easy homemade sourdough bread recipe with this beginner-friendly guide.

If you’re just diving into the wonderful world of sourdough bread, welcome aboard! Jumping into this world can be intimidating and overwhelming, but it is oh so rewarding too!
Don’t worry if you’re a bit nervous or unsure—everyone starts somewhere, and sourdough baking is as much about the process as it is about the end result.
If your first loaf doesn’t turn out exactly as you hoped, don’t be discouraged. Learning to bake sourdough is all about practice, observation, and adjustment. With each bake, you’ll gain a better understanding of the nuances of fermentation, dough handling, and oven management. So roll up your sleeves, dust off your flour, and get ready to embark on a delicious adventure in sourdough baking!
Let’s dive into these sourdough bread for beginners tips!
How to Rehydrate Sourdough Starter
If you are starting with a dehydrated sourdough starter, this post is going to be your go to resource! So let’s dive in and get started right away!
Add double the amount of warm water (spring water) not distilled or reverse osmosis to rehydrate it.
Once it’s rehydrated. Measure the amount of starter you have.
If you now have 30 oz of starter you will feed it double the amount of bread flour and warm water. Feed at a 1-2-2 ratio.
Example:
- 50 grams starter
- Add 100 grams of bread flour
- Add 100 grams of warm spring water
Mix it until fully incorporated. It should be a thick pancake batter consistency.
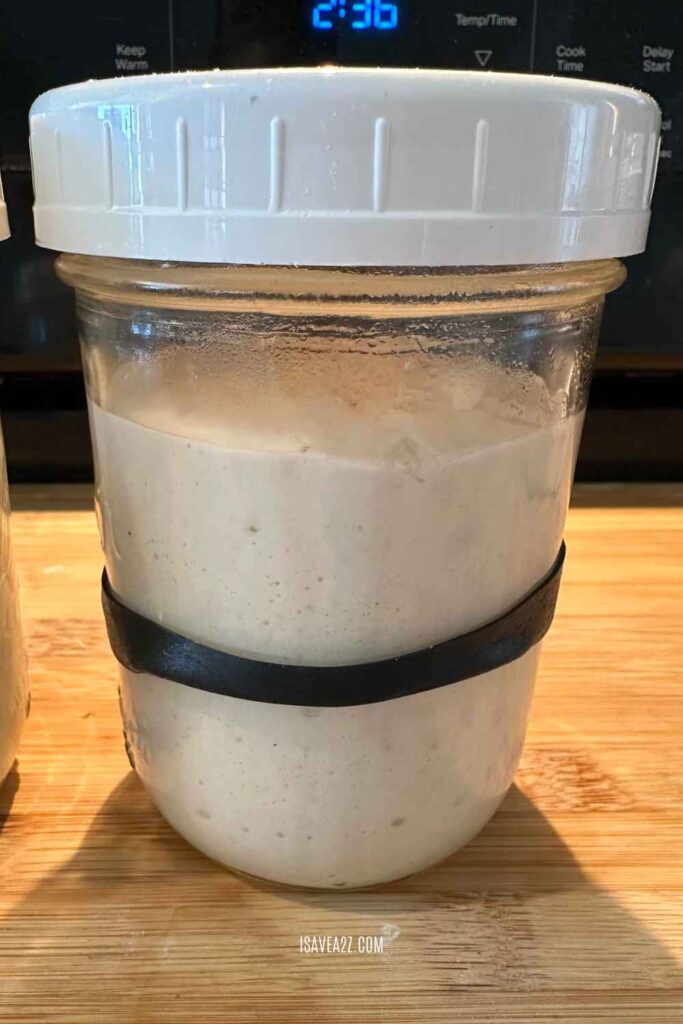
This is how you feed your starter.
The amount of starter you need for a recipe is how much you feed your starter.
I always feed my starter at night and let it sit out on the counter so it’s ready when I wake up the next morning. If you keep your how cool like I do, you may need to keep it in the microwave with the door open so the light will make it a tad bit warmer to help your starter grow. It should double in size.
Every time you feed your starter you will discard the remaining. Meaning, I always start with only 50 grams of starter to activate it. This gives me about 250 grams of starter and that’s really good for most recipes.
Whatever you don’t use, start a discard container to keep in your refrigerator. The “discard” just means starter but not really active because it’s cold and sitting in the refrigerator.
The discard can sit in your refrigerator for months without use and still be good. I tend to stir my discard at least once a week. You will know the starter is “bad” or not useable if it grows any kind of mold. I’ve never had this happen. If you see mold, I would trash it and start all over.
I tend to make bread once a week so I am adding active starter to my discard at least weekly or every other week.
I noticed at one point that my discard was getting low so I activated some and just added the whole container to my discard so I would have plenty if I wanted to make discard recipes.
If you run low you need very little discard to start new. You can start with only 5 grams and feed it 10 grams of bread flour and 10 grams of spring water to get it going again.

RECIPE: BASIC SOURDOUGH BREAD FOR BEGINNERS
I start making this in the morning:
- Add active starter and warm water and mix until milky.
- Add flour and salt and mix until shaggy dough forms.
- Cover and let sit for 30 minutes.
- Then start stretch and folds. Cover and set aside for 30 minutes.
- Do this about 3 or 4 times until the dough forms a nice smooth ball. This allows you to strengthen the gluten.
- Then allow the dough to sit out covered to bulk ferment until it has doubled in size. If your house is cool like mine, you may need to put it in the microwave with the door open so the light provides it a little warmth.
- Once it has doubled in size you will flip the dough out on a floured surface and work the dough.
- Then shape the dough and add it to a container to keep in the fridge overnight.
- The next morning you can bake your bread.
- Score your bread.
- Preheat the oven and your dutch oven. Remove the hot dutch oven and then add your dough.
- Cover the dutch oven and allow it to cook at 450 degrees for 30 minutes. Then remove the cover and cook for another 25 to 30 minutes at 450 degrees until it’s golden brown.
The inside temp of your bread should be 205-210 degrees to show it’s fully cooked if you don’t want to cut it open to see.
Slice your bread using a bread knife but wait an hour until it fully cools.
Be sure to pin this sourdough bread for beginners recipe for later!