DIY Christmas Tree Made Out of Sticks
DIY Christmas Tree Made Out of Sticks
I am always looking out for fun kids project ideas and this DIY Christmas Tree is a wonderful project idea to keep those kids busy. I live on over 5 acres of land so finding sticks is not a problem with all the trees we have surrounding us.
I love any projects that get this kids outside for a bit. I also love project ideas that get their creative juices flowing.
Here’s a Christmas Tree made out of sticks tutorial:
First, find a bunch of sticks about the same width if possible. Finding the sticks almost turned into a race when you have multiple kids doing this same project.
Be sure to have an adult use a small hand saw to trim the branches into the sizes you need. We started off with between 10 to 12 sticks ranging from smaller to bigger. Our branches were not that big so we were able to break them off without the use of a tool.
Next, the kids had to gather things from around the house to decorate their tree with. This was a frugal project so we didn’t buy any extra supplies. We have a full craft area with lots of extra supplies we could use.
Christmas Tree Made Out of Sticks
Supplies
- sticks (small twig trees)
- decorations
- hot glue
- hot glue gun
- string
- ribbon
- tree topper (such as a battery operated tea light, star or ribbon)
- pipe cleaners or wire to attach your ornaments
Here are some decoration supply ideas:
- buttons
- beads
- tiny pom-poms
- small toys
- ribbon
- earrings
- paper
- paper snowflake cutouts
- pine cones
- acorns
- pipe cleaners
- dried corn
- popcorn (on strands)
- fresh greenery
- rhinestones
Instructions
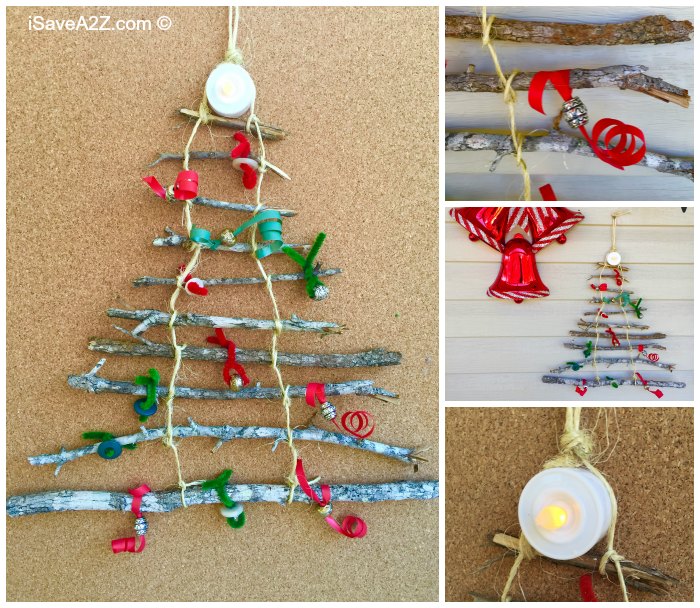
- Start this project by laying out the sticks in the order of size with the smallest at the top and going all the way down to the biggest at the bottom. Cut a piece of ribbon or twine almost double the size of the tree.
- You will need two pieces that are the same size. Start by tying both pieces together in a knot for the top of the tree. Now tie a knot around the first stick on one side and with the other string on the other side as seen in the photo.
- You will want to try to tie your knots the same distance apart on each branch to tie the knot to. Finish at the very last branch by tying a double knot at the end. I added a battery operated tea light to the top of my tree. I didn’t have to glue it because it fit snug in between the twine I used and the first branch.
- Now that your tree is complete, you just have to decorate it! We used ribbon, pipe cleaners in different colors along with buttons and beads on our tree. I have a huge jar of extra buttons that we have been saving for a long time. It comes in handy when making crafts with the kids. I usually take them off ruined shirts that cannot be donated.
We hope you enjoy this fun and frugal project idea. Theses alternative christmas trees are great for a small space this holiday season. Who doesn’t love a great little Christmas tree craft idea that you can do with the kids? I know I have so much fun creating memories with my kids when we make Christmas crafts.
Simple crafts like these make the Christmas season festive and joyful while creating amazing memories the kids will talk about for years to come.
If you like this one you should read our article on 6 Clever Uses for Toilet Paper Rolls! We have a race track that we built out of the toilet paper rolls!! The kids get the biggest kick out of watching marbles or hot wheels go down these tracks!
Feel Free to Pin this project here for later:

Christmas Tree Made Out of Sticks
Materials
- SticksDecorations
- GlueString
- Ribbon
- Tree Topper such as a battery operated tea light, star or ribbon
- Pipe Cleaners or wire to attach your ornaments
Instructions
- Start this project by laying out the sticks in the order of size with the smallest at the top and going all the way down to the biggest at the bottom. Cut a piece of ribbon or twine almost double the size of the tree.
- You will need two pieces that are the same size. Start by tying both pieces together in a knot for the top of the tree. Now tie a knot around the first stick on one side and with the other string on the other side as seen in the photo.
- You will want to try to tie your knots the same distance apart on each branch to tie the knot to. Finish at the very last branch by tying a double knot at the end. I added a battery operated tea light to the top of my tree. I didn’t have to glue it because it fit snug in between the twine I used and the first branch.
- Now that your tree is complete, you just have to decorate it! We used ribbon, pipe cleaners in different colors along with buttons and beads on our tree. I have a huge jar of extra buttons that we have been saving for a long time. It comes in handy when making crafts with the kids. I usually take them off ruined shirts that cannot be donated.
Notes
- buttons
- beads
- pom-poms
- small toys
- ribbon
- earrings
- paper
- paper snowflake cutouts
- pinecones
- acorns
- pipe cleaners
- dried corn
- popcorn (on strands)
- fresh greenery
- rhinestones
Nutrition facts are provided as a courtesy.