
Costume Wolf Tail Tutorial

Costume Wolf Tail Tutorial
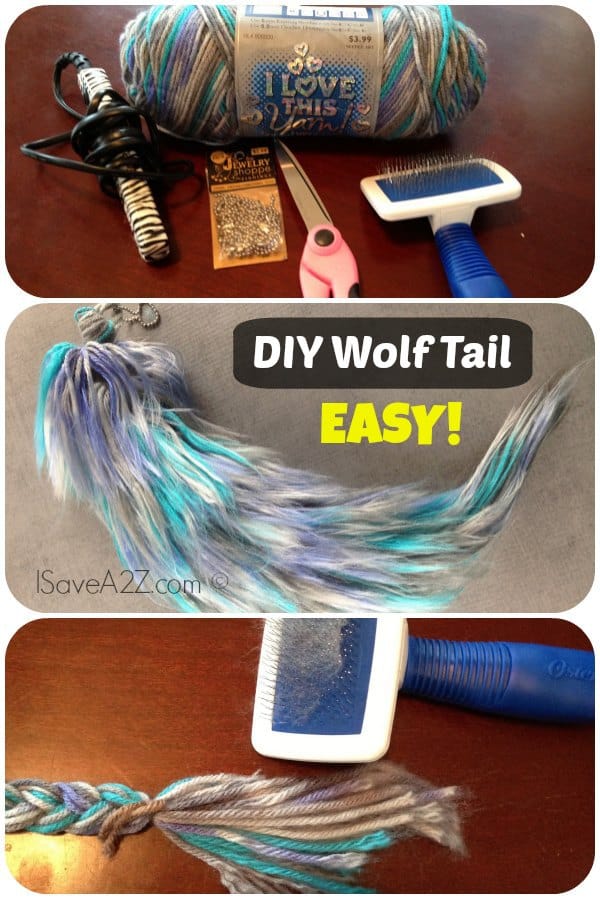
Check out this super easy Costume Wolf Tail Tutorial! The materials aren’t expensive, and it’s so easy to do on your own, you won’t believe it! Here are the materials you’re going to need.
UPDATE: We created a video to help show this whole process. Head over here on our DIY Fox Tail tutorial to see this video.
- Yarn (100% Acrylic)
- Scissors
- Pet Brush
- Hair Straightener
- Key Chain Holder (like these here!)
Wolf Costume
First, what you’re going to want to do is measure out with the yarn how long you want the tail. The longer it is, the more time consuming it will be. Keep that length on the string and double it over and over. For this tail, I did it about 12 times. By this, I mean add more yarn to it of the same length, so that there are 12 pieces of string of the same length that you want your tail. The more you double it, the thicker your tail will be.

Once you do that, cut the loops of the yarn that you made on each side, and knot it at one end. This makes all the string pieces individual. This will be the top of the tail. Now separate the dangling yarn pieces into three, and braid all the way down. Make another knot at the bottom once finished. Now with the yarn that is hanging out of the knot, you can either cut it, or you can brush it out. Either is fine, but I prefer to keep it on.

Creating Your Base of Wolf Tail
Now that you have the base of your tail, go back to your ball of yarn, and start wrapping it loosely around your hand about ten times. What you’re doing here, is making smaller individual pieces of string by cutting the string after it’s been looped. What you’re going to do now is take a piece of stray string, make sure it isn’t too short, and tie a knot around the middle of the cut string. You should have smaller individual pieces of string, with another piece of string knotting them in the middle.
Brush out the Yarn
Now hold these pieces of string on the knot that you had made tightly as you take your pet brush and bush out the yarn. This can take a little while to make it look like fur, and it might start to hurt your fingers. Once it’s brushed out, you’re going to take your hair straightener, on the lowest setting, and straighten out the yarn, since before you do this, it will more than likely look all curly, and not so great. After straightening the fur, I brush it out a few more times, and then it looks like fur! Take the ends of the knot you made earlier, the part you didn’t brush out, and tie it around the bottom part of your tail.
Pro Tip: This pet brush works amazing! If you don’t have a good pet brush it will take you a lot longer to create this effect.

Brush out the wolf tail
Repeat this process until you get all the way to the top! Now you can take your clamp, slip it under a few pieces of string within the knot on top, and clamp it together! Easy as that! You’re tail will be done in 3-4 hours depending on the length of your tail.

Pretty easy, huh? Just a bit time consuming, but all in all, it’s easy to do! Feel free to get creative with colors too! You don’t have to stick to just one color yarn!
Here’s one I just made for a dear friend of mine. I think he’s gonna love it! What do you think?

i got all my suppliys at dollar tree and they work great
So cool i love the wolf tail thing it’s so cool
This was an amazing project! It took me three and a half hours but the results were fantastic! I recommend making a lot of the tufts that way it doesn’t look to patchy. other than that though it was amazing! I got so many compliments and let me say it was TOTALLY worth the three and a half hours!
Awesome!!! I would love to add your project photo to our article if you want to send it to us. Our email is jennifer@isavea2z(dot)com
Honestly it’s great! I’m using this for my mangel cosplay and halloween costume!
my fab tip: get really soft yarn. it is easier to brush out and it will make a really soft, fluffy tali. just be sure to brush softly so you dont loose it all in the brush
Thanx.That helped alot.this is really cool
I’ve been slaving over mountains of fluff, trying to make nearly ten of these for friends as holiday gifts. It’s such an easy craft, but very time consuming and requires some trial and error. Here are a few of my discoveries, as well as a recap of some of the other commenters’ advice.
1) Type of yarn: 100% acrylic is pretty important when it comes to the flat iron stage. Polyester may melt, and wool may burn, but the acrylic yarn has a very fur-like texture when it’s done.
2) Fur texture: for coarse textured fur, use yarn that is marked medium. The thicker you go, the fluffier the tail will be. I prefer the bulky and extra bulky sizes, as it’s easier to brush out, but BUYER BEWARE: at least 1/3 of your yarn will end up in the brush.
3) Brush: the type of pet brush MATTERS. I used a dog brush with two sides. One side is a synthetic bristle hairbrush-style, the other is a natural, tightly grouped-style. Combining both of these yielded decent results, but I noticed significant flaws with that type. Use a brush like the one pictured: square/rectangular, with closely grouped metal spines that are relatively short.
4) Base: the braided base can be made with any old yarn. It’s simply the point where you attach all of the fluff tufts. However, if you want to keep the loose ends at the bottom visible, you should use a color you want.
5) Tying the tufts: As you begin to tie on the tufts to the base braid, you may begin to notice unseemly gaps. While brushing and layering the straightened tufts eliminates the more obscene gaps, the best way to avoid this is to alternate the sides where you’re laying on the hair. Tie one tuft on, and then flip the braid over and tie another tuft above that. This helps somewhat.
6) Finishing the top: if you find yourself a little confused with how to attach the tail once it’s complete, you can do what I did. I either made the braid a little longer than I wanted the tail to be, and tied a loop at the top. OR, you could leave the loose ends on the top a little longer, and form a smaller braid from just a few of these ends, say three or six, and tie it to your fastener.
7) Fasteners: You can use a lot of different fasteners and clasps for your tail. I prefer to use a simple safety pin that can fasten to anything, regardless of a loop. But if you want something a bit more durable, you can use index card rings, carabiners, or of course the ball chain and clasps recommended above. It’s a pretty adaptable purpose. You can definitely find creative ways to attach these tails.
I hope this helps clear up some confusion. I would recommend making a miniature tail as practice, perhaps a key chain or doll tail, as a way of working out the little gremlins. You learn a lot just by doing. These tails are just like pancakes: the first one always goes a little wrong.
If you have any questions, please reply and I’ll try to help out. Thanks Jennifer for this awesome tutorial. I had no idea how to do this before stumbling upon it.
Elle, Thank you for adding all the helpful tips! I think I got this now + am going to give it a go. I think a really idea.
is it possible to use 60% acrylic? i have a yarn that is 60% acrylic and 40% nylon… can i use that?
I found the “Red Heart” brand is best. I’m not sure the make up of fibers though.
Omg Thank You So So Much!!! I Spent like 4 hours on this!!!!! I Am So Proud Of Myself!!!!!!!
If you don’t have a hair straightener you can use a spray bottle filled with water. Warning! If you use the water there will still be waves but not as big.
when tying on the fur fluffs, did you do two on each side? And I do agree with a lot of the other comments, more descriptions and more pictures! It’d help a lot.
This was so easy to make!!! Mine is about halfway done bug it looks great!!! Oh and if u need a video go on YouTube and this girl named Zulala is very good at making these….look on her page for “yarn tail tutorial ” it was a gr8 video and very help full…sorry for telling about someone else on it page but ur tail is so cool!!
Would make an awesome unicorn tail also!
Seriously!? What is the trick to not leaving all of your yarn on the brush? The instructions are insanely easy, but I’m leaving ALL of the yarn on the brush..
My first try was almost like that too, hold your knot tight, comb gently and not too much!
yes I am having that same problem the yarn is coming off and staying on the brush.
I know right!! I have to make THREE of these for my friends.
My daughter and i are making this right now for her wolf costume.. so far its going well, but yes, a little time consuming., thats ok! Just wondering, what are some suggestions you have for actually attaching it?
I put a belt on the hoop
Great tutorial! I actually found it very easy to understand and follow 🙂 I can’t wait to make one of these for my boyfriend. He is gonna flip out!
Could you make a video on how to do the black and purple tail?
Great little project for those boring rainy days inside. However, I do agree with some of the others. More pictures in the future would be helpful. Like how much to wrap around your hand and where/how to tie the “fur” parts to the braid. Very fun though!!!
Is there any chance you’d revisit this project with more photos? Honestly, I have no clue what to do after the braiding part, and I’ve read this like 5 times. I really like the way this looks and this would be great for a Halloween costume, but I’m so confused right now.
Go on YouTube and look for Zulala’s yarn tail tutorial
I was wondering if there was a way to make ears using this method?
Try using this tutorial but with WAAAAY smaller measurements. Then tie a knot at the end, leaving some sticking out and brush that too. It will kind of look like lynx ears a little bit, but they will still be ears. Don’t forget to glue them on a headband!
I’m sure that you could glue a piece of foam from Micheal’s and do the same steps but hot gluing the base to the foam. That *should* work, but I’d try it out on a test piece first. 😉
I am going to try this by sewing the fluffs onto a piece of felt and then just use a simple cat ear tutorial as if you’re using faux fur.
This looks fantastic! I am making a wolf costume for my grandson who is only 1 and this will make it so much cuter! I think I get all the instructions but I have one question….is the braided part left alone and just used as a base to tie on the brushed out pieces? Thanks!
This tutorial could have been really great, if you had used more pictures or even a video. Needs more description because I am very confused.
You should put out a YouTube video. I think a lot of people would really love this but the pictures are a little vague.
My daughter is in love with this. In fact you have inspired a wolf costume that I am starting today for Halloween. Wish me luck.
What brand of yarn do you use or does it matter if its 100% Acrylic?
We used Red Heart but you can use any. I find the stiffer feeling brands tend to do better though. I always go to whats on sale.
Some more pictures would be nice to figure some of the in-between steps. I’d also love to see how to make ears!!
This is perfect for my wolf cosplay. I can’t wait to start this!!
I LOVE this tutorial! Thank you for sharing. It is so very simple. I understood it the first time and was able to start on my own.
Thank you for sharing!
did anyone else have a ton of yarn fiber come off in the brush?
Yes, I wasted a lot of yarn cause it was thinning out too much. I had wrapped it around my hand twelve times too. It’s a shame cause my daughter is going to be a fox for Halloween and I had been trying to figure out a creative tail.
I found that the type of yarn that you use depends on how much is pulled out. The stiffer yarn that doesn’t have that much fluff to it tends to work better when you brush it out. Hope that helps for you.
The “discount” brands of red heart-like yarn work well, they’re very stiff and too scratchy for most things anyway. A ceramic flat iron makes it a little softer 🙂
(I hope the creator doesn’t mind me helping, I’m making my second one [for my Cheshire cat costume] right meow!) 😉
You just gave me a great idea for my friend! One of her favorite characters in the universe is the Cheshire Cat and this gives me an excuse to try this!! Right now I’m moving and this is our only set of gift giving times so were basically trying to 1-up each other. I thank you so much right now!!
The tail looks great, but the tutorial isn’t very good. Maybe talk to an irl friend who doesn’t know how to do it, and see what they think. And with a tutorial, pictures, pictures, pictures!!
What an amazing tutorial! It is Beautiful and perfect for costumes.
Janie
Its a good tutorial over all but i was a little hard to follow it took me a while to figure put what to
Do exactly but once i did it was easy.
this is really awesome! i finaly got it to work! 🙂
i failed 5 times and waisted a lot of time
I had to read this a few times just to get it, I’m so bad with written instructions sometimes. Still, I have to say that this looks awesome and I can’t wait to try and make some for my kids! Thank you for sharing this!